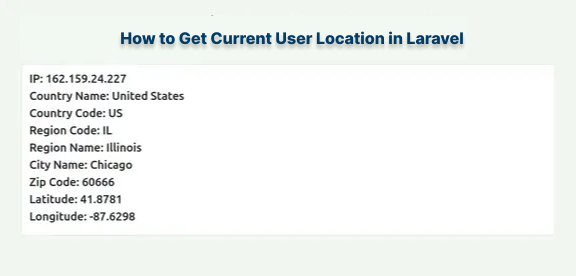
In this article we will learn how to get current user location in Laravel.

How to find user current location, city, country, country code, zip code, postal code, region name, ISO code, IP address, latitude, longitude in Laravel
You are going to learn how to get the current location of a user with their IP address by using the Steve Bauman Location Package in this article. Getting a user's location based on their IP Address may be accomplished with the help of the stevebauman/location Laravel package. This makes it easy to find out where a user is based on their IP address. The following types of location information can be retrieved with the assistance of the location library:
- Country name and code
- Region name and code
- City name
- Zipcode
- ISO code
- Postal code
- Latitude and longitude
- Metro code
Laravel Get Current User Location Tutorial
In this we will get current user location by follow below steps.
Step 1 – Install Laravel
Step 2 – Establishing a Connection to the Database
Step 3 – Install the stevebauman/location library
Step 4 – Create Route
Step 5 – Create Controller
Step 6 – Create Blade File
Step 7 – Run
Step 1 – Install Laravel
Start a new Laravel project. This is the first thing that needs to be done. Then, use the code below to download and install Laravel.
composer create-project --prefer-dist laravel/laravel blog
Step 2 – Establishing a Connection to the Database
The next step is to link the MySQL database and the Laravel program together. After making the database, we'll need to set the database passwords in the application's.env file.
DB_CONNECTION=mysql
DB_HOST=127.0.0.1
DB_PORT=3306
DB_DATABASE=database-name
DB_USERNAME=database-user-name
DB_PASSWORD=database-password
Step 3 – Install the stevebauman/location library
In this stage of the process, we will be using the composer dependency management to install the stevebauman/location Package. Installing the stevebauman/location Package can be done by using the following command.
composer require stevebauman/location
Now, Go to config directory and open app.php file here and register this package into laravel app by add the below code in app.php file:
'providers' => [
    ....
    Stevebauman\Location\LocationServiceProvider::class,
],
'aliases' => [
    ....
    'Location' => 'Stevebauman\Location\Facades\Location',
]
Step 4 – Create Routes
Once this is done, we will need to put in information about routes in the routes/web.php file. Let's get started by opening the routes/web.php file and adding the routes listed below to it.
routes/web.php
<?php
use Illuminate\Support\Facades\Route;
use App\Http\Controllers\UserController;

/*
|--------------------------------------------------------------------------
| Web Routes
|--------------------------------------------------------------------------
|
| This section of the application is where web routes
| can be registered for your application. These routes are
| loaded by the RouteServiceProvider within a
| group that also contains the "web" middleware group.
| This group is called "web" middleware group.
| Now go make something truly amazing!
*/

Route::get('display-user', [UserController::class, 'index']);
Step 5 – Create Controller
Now, using the command that is provided below, let's create a controller that we will call UserController.
php artisan make:controller UserController
Now, open the UserController.php file located in the app/Http/Controllers directory. After that, edit your UserController.php file to include the following line of code:
<?php

namespace App\Http\Controllers;

use Illuminate\Http\Request;
use Stevebauman\Location\Facades\Location;

class UserController extends Controller
{
    /**
     * Display a listing of the resource.
     *
     * @return \Illuminate\Http\Response
     */
    public function index(Request $request)
    {
        /* $ip = $request->ip(); Dynamic IP address */
        $ip = '162.159.24.227'; /* Static IP address */
        $currentUserInfo = Location::get($ip);

        return view('user', compact('currentUserInfo'));
    }
}
Step 6 – Create Blade File
Creating the blade view file is the task at hand for this stage. Create a user.blade.php file by navigating to the resources/views directory. Then insert the code that is shown below into it:
<!DOCTYPE html>
<html>
<head>
    <meta charset="utf-8">
    <title></title>
    <link href="https://cdn.jsdelivr.net/npm/bootstrap@5.0.2/dist/css/bootstrap.min.css" rel="stylesheet">
</head>
<body>

<div class="container">
    <h1>How to Get Current User Location with Laravel</h1>
    <div class="card">
        <div class="card-body">
            @if($currentUserInfo)
                <h4>IP: {{ $currentUserInfo->ip }}</h4>
                <h4>Country Name: {{ $currentUserInfo->countryName }}</h4>
                <h4>Country Code: {{ $currentUserInfo->countryCode }}</h4>
                <h4>Region Code: {{ $currentUserInfo->regionCode }}</h4>
                <h4>Region Name: {{ $currentUserInfo->regionName }}</h4>
                <h4>City Name: {{ $currentUserInfo->cityName }}</h4>
                <h4>Zip Code: {{ $currentUserInfo->zipCode }}</h4>
                <h4>Latitude: {{ $currentUserInfo->latitude }}</h4>
                <h4>Longitude: {{ $currentUserInfo->longitude }}</h4>
            @endif
        </div>
    </div>
</div>

</body>
</html>
Step 7 – Run
Now that our demonstration is ready to be executed, let's get the development server up and running by using the following artisan command:
php artisan serve
Now, in order to view the output, open the following URL in your browser:
http://127.0.0.1:8000/display-user
Output
