In this tutorial we will learn that how to import excel file data in database using laravel
If you do not know how to install laravel then click here to install laravel .
Step 1- Install Laravel Maatwebsite Excel
Open your CMD and just run below command to install this package.
Learn more about this article - https://laravel-excel.com/
composer require maatwebsite/excel
Step 2- Now, go to config\app.php
Link this package in app.php file
'providers' => [
....
Maatwebsite\Excel\ExcelServiceProvider::class,
],
'aliases' => [
....
'Excel' => Maatwebsite\Excel\Facades\Excel::class,
],
Step 3- Run below command for publish the vendor file
php artisan vendor:publish --provider="Maatwebsite\Excel\ExcelServiceProvider" --tag=config
step 4 – Create 'users' table in your database

Step 5- Create model for User
php artisan make:model User
Now this file has been created in the app folder, Generated file path is app\Models\User.php
This is our User.php file
<?php
namespace App;
use Illuminate\Database\Eloquent\Model;
class User extends Model
{
    protected $fillable = [
        'name',
        'email',
        'age',
    ];
}
then,
Run this command in CMD to generate UsersImport.php file
php artisan make:import UsersImport --model=User
Now this file has been created in the app folder, Generated file path is Imports\UsersImport.php
This is our UsersImport.php file
<?php
namespace App\Imports;
use App\User;
use Maatwebsite\Excel\Concerns\ToModel;
class UsersImport implements ToModel
{
    /**
    * @param array $row
    *
    * @return \Illuminate\Database\Eloquent\Model|null
    */
    public function model(array $row)
    {
        $data = [
            'name' => $row[0],
            'email' => $row[1],
            'age' => $row[2]
        ];
        User::create($data);
    }
}
step 6 – Create route
   Route::get('/', 'UserController@import_excel');
   Route::post('import', 'UserController@import');
Step 7 – create controller
php artisan make:controller UserController
UserController.php
<?php
namespace App\Http\Controllers;
use Maatwebsite\Excel\Facades\Excel;
use Illuminate\Http\Request;
use App\Imports\UsersImport;
class UserController extends Controller
{
    function import_excel(){
        return view('import_excel');
    }
    function import(Request $request){
        if($request->file('file')){
            $import =  Excel::import(new UsersImport, request()->file('file'));
            $msg_success = "Data Uploaded Succesfully! ";
            $msg_danger = "Data Uploaded failed! ";
            if ($import) {
                return redirect('/')->with('success', strtoupper($msg_success));
            }else{
               return redirect('/')->with('danger', strtoupper($msg_danger));
            }
        }
        else{
            $msge = "please choose your file! ";
            return redirect('/')->with('choose_file', strtoupper($msge));
        }
    }
}
Step 8 – Create blade file
import_excel.blade.php
<!DOCTYPE html>
<html lang="{{ str_replace('_', '-', app()->getLocale()) }}">
<head>
    <meta charset="utf-8">
    <meta name="viewport" content="width=device-width, initial-scale=1">
    <title>Laravel Excel</title>
    <!-- Fonts -->
    <link rel="stylesheet" href="https://maxcdn.bootstrapcdn.com/bootstrap/4.0.0/css/bootstrap.min.css"
        integrity="sha384-Gn5384xqQ1aoWXA+058RXPxPg6fy4IWvTNh0E263XmFcJlSAwiGgFAW/dAiS6JXm" crossorigin="anonymous">
    <link href="https://fonts.googleapis.com/css2?family=Nunito:wght@400;600;700&display=swap" rel="stylesheet">
    <script src="https://code.jquery.com/jquery-3.2.1.slim.min.js"
        integrity="sha384-KJ3o2DKtIkvYIK3UENzmM7KCkRr/rE9/Qpg6aAZGJwFDMVNA/GpGFF93hXpG5KkN" crossorigin="anonymous">
    </script>
    <script src="https://cdnjs.cloudflare.com/ajax/libs/popper.js/1.12.9/umd/popper.min.js"
        integrity="sha384-ApNbgh9B+Y1QKtv3Rn7W3mgPxhU9K/ScQsAP7hUibX39j7fakFPskvXusvfa0b4Q" crossorigin="anonymous">
    </script>
    <script src="https://maxcdn.bootstrapcdn.com/bootstrap/4.0.0/js/bootstrap.min.js"
        integrity="sha384-JZR6Spejh4U02d8jOt6vLEHfe/JQGiRRSQQxSfFWpi1MquVdAyjUar5+76PVCmYl" crossorigin="anonymous">
    </script>
    <!-- Styles -->
    <style>
        body {
            font-family: 'Nunito', sans-serif;
        }
        #hideMe {
            -webkit-animation: seconds 1.0s forwards;
            -webkit-animation-iteration-count: 1;
            -webkit-animation-delay: 3s;
            animation: seconds 1.0s forwards;
            animation-iteration-count: 1;
            animation-delay: 3s;
            position: relative;
        }
        @-webkit-keyframes seconds {
            0% {
                opacity: 1;
            }
            100% {
                opacity: 0;
                left: -9999px;
                position: absolute;
            }
        }
        @keyframes seconds {
            0% {
                opacity: 1;
            }
            100% {
                opacity: 0;
                left: -9999px;
                position: absolute;
            }
        }
    </style>
</head>

<body class="antialiased ">
    <div class="d-flex  align-items-center justify-content-center ">
        <div class="mt-2 border">
            <h4 class="m-0 p-0" style="color: #495057" for="">Imort</h4>
            <div class="border p-2 ">
                @if (\Session::has('success'))
                    <div class="text-success text-center" id="hideMe">
                        <strong id="hideMe" style=" text-align:center !important;">{!! \Session::get('success') !!}</strong>
                    </div>
                @endif
                @if (\Session::has('danger'))
                    <div class="text-warning text-center" id="hideMe">
                        <strong id="hideMe" style=" text-align:center !important;">{!! \Session::get('danger') !!}</strong>
                    </div>
                @endif
                @if (\Session::has('choose_file'))
                    <div class="text-danger text-center" id="hideMe">
                        <strong id="hideMe" style=" text-align:center !important;">{!! \Session::get('choose_file') !!}</strong>
                    </div>
                @endif
                <form action="import" class="p-2" method="post" enctype="multipart/form-data">
                    @csrf
                    <h2>Upload Excel File Here</h2>
                    <input type="file" name="file" accept=".csv" class="form-control col">
                    <input class="btn btn-success m-1" type="submit" value="Import">
                </form>
            </div>
        </div>
    </div>
</body>
</html>
OUTPUT

Step 9 – Run php artisan serve

Then, go to your browser and upload your excel file .
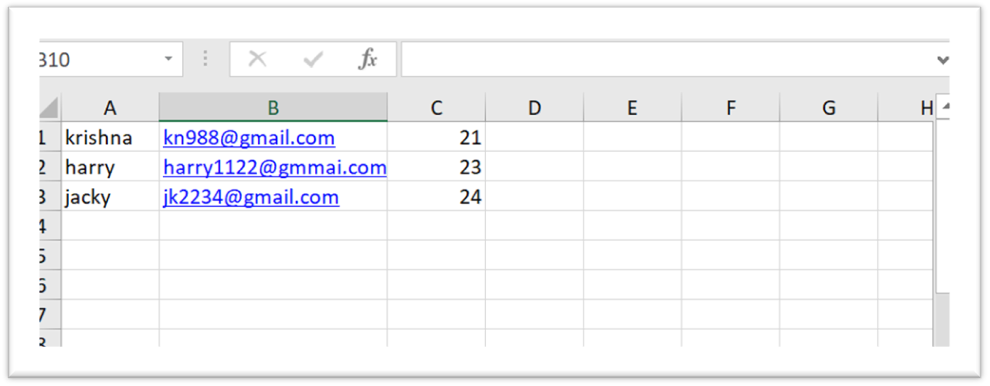
Here is users.xlsx for upload
OUTPUT

Here is uploaded data
